




By Naithen Matthews (ISSA Certified Personal Trainer & Nutrition Specialist)
If you get down on the floor, try to push yourself up, and absolutely nothing happens, you are not alone. Most fitness guides rush you into the movement, but learning how to do a pushup for beginners the right way requires proper preparation. Before I became a fitness coach, I was stuck at absolute zero too. In this honest guide, I’m breaking down the exact 8-week system that builds your shoulders, wrists, and core so you can nail your first real rep with flawless form.
Disclaimer: If you have any shoulder, wrist, or joint injuries, consult a healthcare professional before starting this or any exercise program.
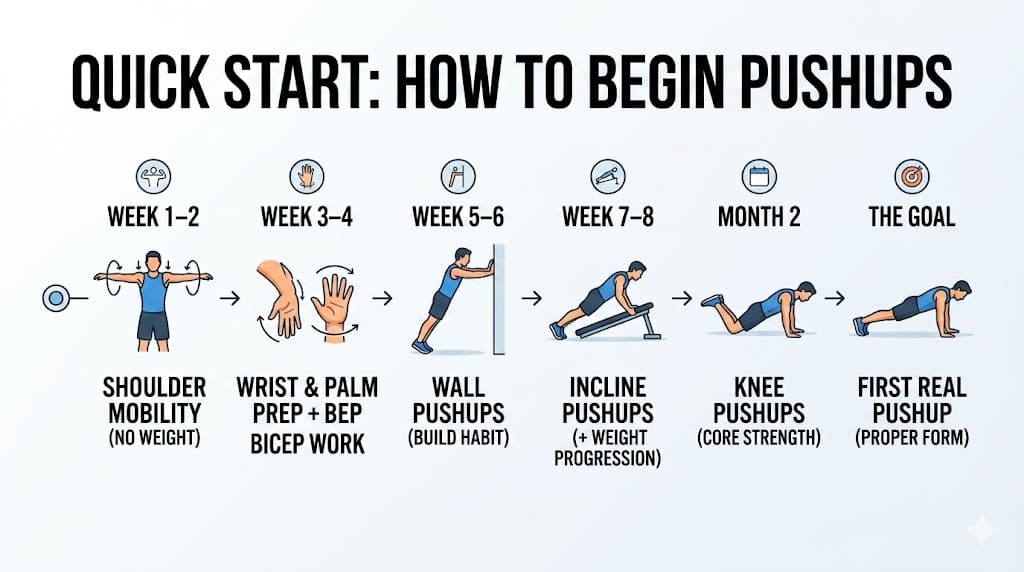
Quick Answer: How to Start Pushups as a Beginner
If you are short on time, here is the exact step-by-step roadmap to building enough strength for your first full pushup.
- Week 1–2: Shoulder mobility exercises (no weight)
- Week 3–4: Wrist and palm prep + light bicep work
- Week 5–6: Wall pushups — build the movement habit
- Week 7–8: Incline pushups — then add weighted progression
- Month 2: Knee pushups for core strength
- Then: Your first real pushup with proper pushup form
Detail mein samajhna ho toh neeche poora guide hai.
Introduction
Pushups are one of the best exercises to start your fitness journey. No gym, no equipment, no cost. But learning how to do a pushup for beginners the right way — not the way most guides show you — is what separates people who build real strength from people who quit after three days.
Before the steps, I need to ask you something honest.
Two Types of Beginners — Which One Are You?
Type 1: You can already do 10 to 15 pushups. Form might need work, but you are moving. Go straight to the proper pushup form and progressive overload sections. Wall pushups and knee pushups are not your priority right now.
Type 2: You get down on the floor, try one pushup for beginners, and nothing happens. Zero. Not one rep. There is no shame in this — I was exactly here when I started.
This guide is written for Type 2 first. Type 1 readers — still read the form checklist. It will fix things you did not know were wrong.
Why You Cannot Do a Pushup Right Now
Most people try a pushup, fail, feel embarrassed, and quit. They think they are just weak. That is not the real problem.
The real problem is preparation. Three things are working against you right now:
Your shoulders have never done any serious pushing work. They are stiff and completely unprepared for this movement. Your wrists and palms buckle immediately under bodyweight because they have never been trained for it. And your biceps fatigue in seconds because they have never seen this kind of demand.
The solution is not to keep failing at the same pushup. The solution is a two-month preparation system that builds your body properly before your first real pushup. I know that sounds slow. This approach is what actually works.
Month One: Building the Foundation
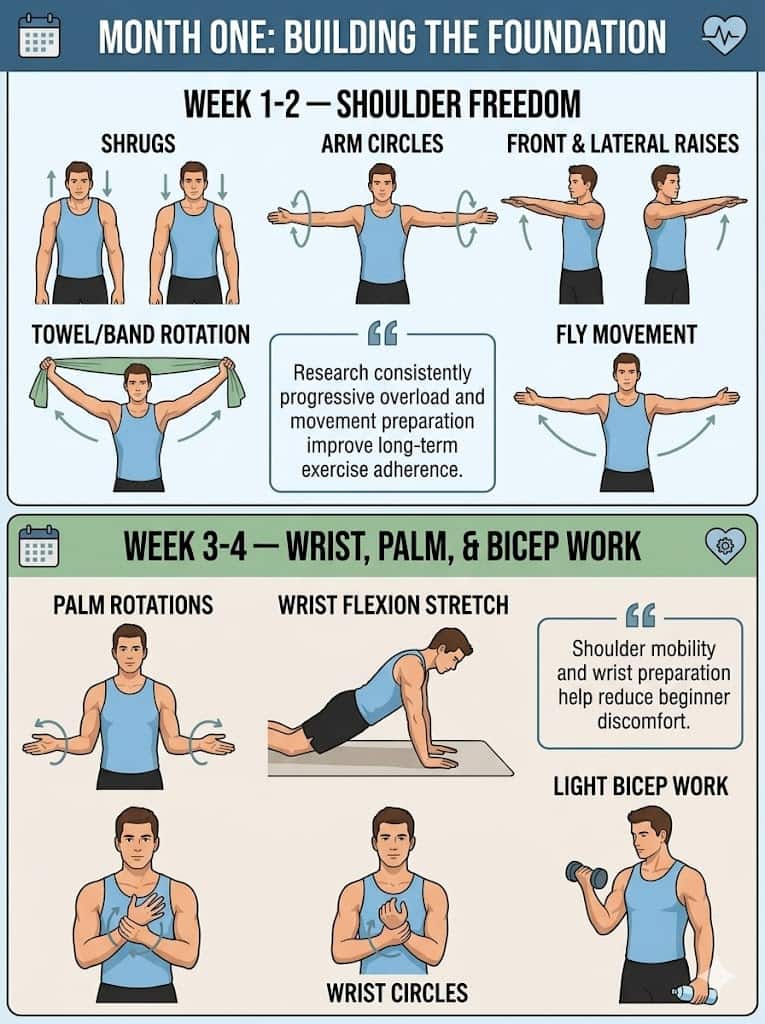
Week 1 and 2 — Shoulder Freedom
Your shoulders are the most important part of every pushup — from wall pushups to incline pushups to advanced variations. For most beginners, their shoulders are completely locked up with zero mobility.
Do these every single day. No weights at all.
Shrugs: Lift shoulders toward your ears, hold two seconds, release. Three sets of fifteen.
Arm circles: Slow and big. Fifteen forward, fifteen backward.
Front and lateral raises: Arms straight, raise to shoulder height, lower slowly. Three sets of twelve. No weight.
Towel or resistance band shoulder rotation: Hold a towel or resistance band with both hands wide apart. Slowly rotate it over your head and behind your back. This one movement will noticeably improve your shoulder mobility within two weeks. Ten slow reps daily.
Fly movement: Arms wide open, bring together in front of your chest in a slow arc. Three sets of fifteen.
After fourteen days most beginners notice their shoulders feeling significantly freer and more mobile. This is the foundation every pushup variation is built on.
“Research consistently shows progressive overload and movement preparation improve long-term exercise adherence.”
Week 3 and 4 — Wrist, Palm, and Light Bicep Work
This phase is what most beginner pushup guides skip entirely. It is also exactly why people get wrist pain during wall pushups and stop.
Palm rotations: Extend both arms forward. Rotate palms clockwise fifteen times, anti-clockwise fifteen times. Slow and deliberate.
Wrist flexion stretch: Palm flat on a surface, fingers pointing back toward you. Gently press down. Hold twenty seconds each side.
Wrist circles: Interlace fingers, rotate both wrists together. Twenty reps each direction.
After two weeks of daily wrist work, begin light bicep training. A water bottle, a one kilogram weight, anything with slight resistance. Three sets of twelve curls. The goal is activation, not strength yet.
By the end of week four, your hands and wrists have been consistently trained for two full weeks. The buckle and pain you would have felt in a pushup position will be significantly reduced — sometimes gone entirely.
“Shoulder mobility and wrist preparation help reduce beginner discomfort.”
Month One Continues: First Pushup Variations
Week 5 and 6 — Wall Pushups
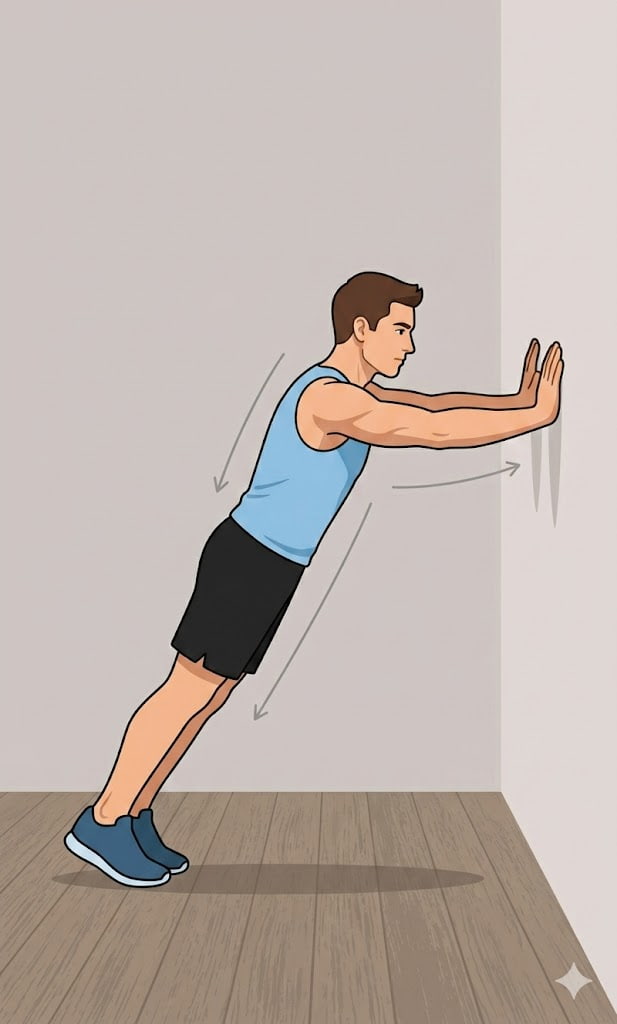
Now you are ready to begin the actual movement. Wall pushups are the easiest entry point into the pushing pattern and the smartest starting point for any pushup for beginners routine.
Stand facing a wall. Palms flat on the wall at shoulder height and width. Step back slightly. Bend elbows and bring chest toward the wall, then push back. That is a wall pushup.
The most important rule for these two weeks: do not count reps and do not chase numbers. Your only goal is to build the movement habit. Do as many as you comfortably can throughout the day. Stop before it feels like strain. Never overtrain. But show up every single day without skipping.
When wall pushups start feeling genuinely easy — no pain, no extra effort — you are ready for the next step.
Week 7 and 8 — Incline Pushups
Most guides will tell you to go from wall pushups straight to knee pushups. In my experience, that is the wrong order. Incline pushups first.
Find a surface at roughly waist height — a table, a counter, a sturdy chair. Hands on it, body at an angle, perform a pushup. This is an incline pushup. The angle reduces the load compared to a full pushup but demands significantly more than a wall pushup.
Spend a minimum of two weeks here. Same approach — habit first, numbers second.
The Weight Progression Trick
When incline pushups feel genuinely easy — say you are comfortably hitting ten reps — do not jump to the next variation yet.
Get a backpack. Put two kilograms inside. Put it on and perform your incline pushups.
Your reps will drop. Ten may become seven or eight. That is exactly the point. Your pushing muscles are now building real strength against real resistance.
Continue for two to three weeks. Add weight gradually — two kilograms, then three, then four, then five. Then remove the backpack entirely and do incline pushups with no weight.
What you will likely notice: instead of ten reps, you are now hitting twenty or twenty-five. This is strength adaptation. Your muscles were trained under load and now feel the difference without it. Remember this principle. It works at every stage of pushup training.
Month Two: Getting to the Ground
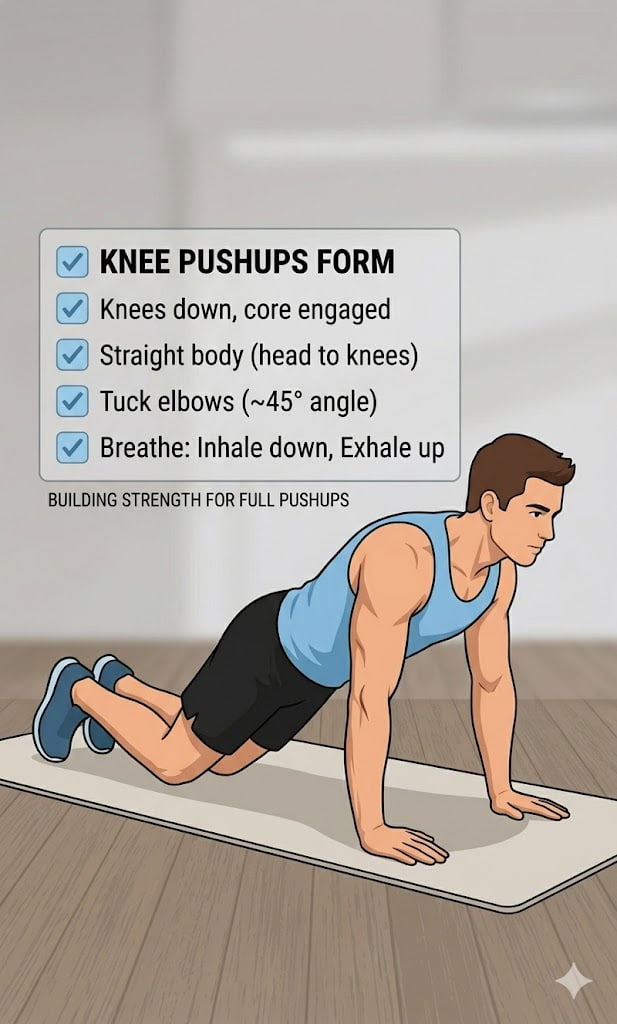
Knee Pushups — Core Activation Phase
After everything you have built over six weeks, knee pushups will likely feel much more manageable than you expected.
Get into a pushup position but lower your knees to the ground. Body from knees to shoulders in a straight line. Lower chest toward the floor, push back up.
The reason knee pushups come at this stage rather than earlier: your body is now much closer to the ground, which means your core has to work considerably harder to keep you stable. Core strength is essential for proper pushup form — knee pushups are where you build it.
Apply the same system here. Habit first. Then add the weighted backpack to build strength. Then remove it and notice how your capacity has grown.
Two weeks minimum before moving forward.
Should Beginners Try the 100 Pushup Challenge?
The 100 pushup challenge is something many beginners come across early and want to attempt immediately. Honest answer: do not attempt it until you can comfortably do 20 to 25 full pushups with proper form in a single set.
Attempting a 100 pushup challenge before your body is ready leads to wrist strain, shoulder fatigue, and form breakdown — which slows your progress rather than accelerating it. Once your base is solid though, the 100 pushup challenge becomes an excellent milestone target. We will cover it in full detail in the next post.
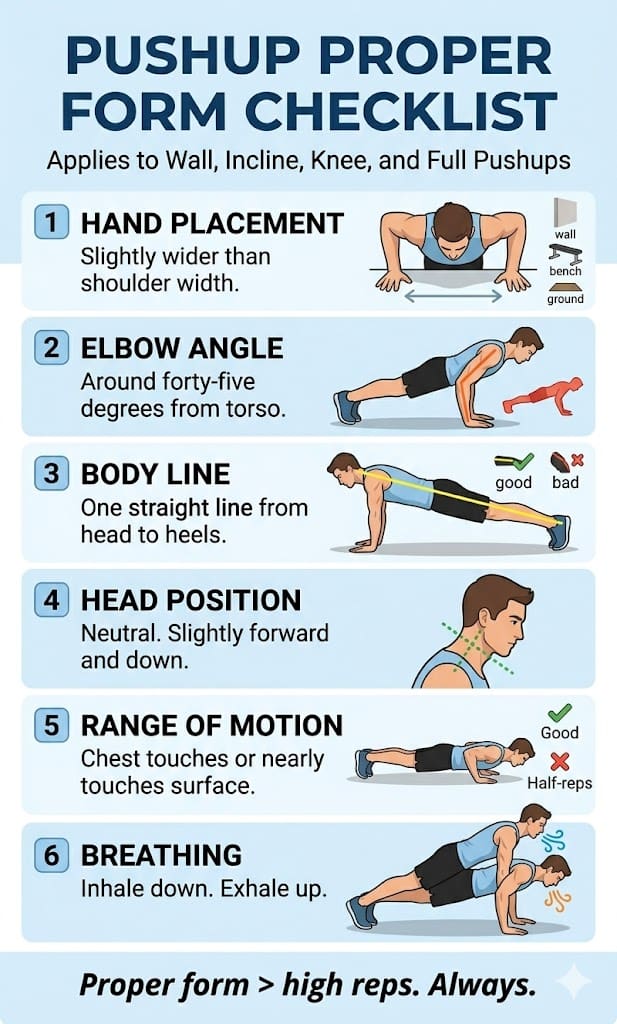
Pushup Proper Form Checklist – Pushup For Beginners
This applies to every variation: wall pushups, incline pushups, knee pushups, and full pushups on the ground.
Hand placement: Slightly wider than shoulder width. Not too wide, not too narrow.
Elbow angle: Around forty-five degrees from your torso. Not flared out at ninety degrees — that stresses the shoulders incorrectly.
Body line: One straight line from head to heels, or head to knees. No sagging hips, no raised backside. Core squeezed throughout.
Head position: Neutral. Slightly forward and down. Neck is a natural extension of your spine.
Range of motion: Chest touches or nearly touches the surface on the way down. Arms do not fully lock out at the top — keep slight tension.
Breathing: Inhale on the way down. Exhale on the way up.
Proper pushup form done with fewer reps is always more valuable than high-rep sloppy movement. Always.
Your First Real Pushup
If you follow this system consistently for two months, most people find they can complete multiple reps of a full ground-level pushup on their first attempt. The preparation work you have done on your shoulders, wrists, and core means the movement is already familiar to your body.
In your first week of full pushups, note how many reps you complete in set one, set two, and set three. Write it down.
From the next week, add one rep per set. Then build to two or three extra. Once you add five reps, stop increasing volume. Shift focus entirely to form quality and strength. Fewer reps done perfectly will build more real strength than chasing numbers with poor technique.
Then apply the weight trick again — same backpack system. Watch what happens to your rep count when the weight comes off.
Adding Variations — The Long Game
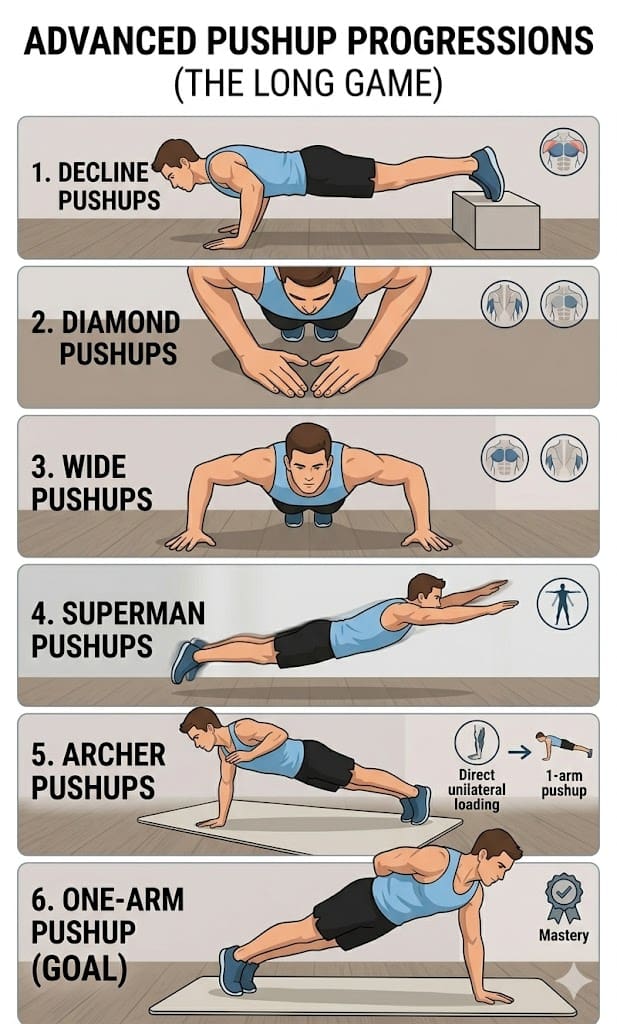
After a few months of consistent full pushups with solid form, begin adding variations. Work through them in this order. Master each one using the same system — habit, then weighted strength, then volume.
Decline pushups: Feet elevated. Shifts emphasis to upper chest and shoulders.
Diamond pushups: Hands close, forming a diamond shape. Triceps and inner chest focus.
Wide pushups: Hands significantly wider than shoulder width. Outer chest emphasis.
Superman pushups: Full body coordination challenge. Learn the movement first.
Archer pushups: One arm carries most of the load. Direct path toward one-arm pushup strength.
Weighted pushups: Backpack on the ground. Same principle, new level.
One-arm pushup: The long-term goal. Takes months of dedicated work. Worth it.
After one consistent year of following this system — not perfect, but consistent — most people can perform every variation on this list. The path is not always smooth. Some days motivation disappears. Soreness comes. Plateaus happen. The people who keep showing up anyway are the ones who get there.
Stretching and Mobility — Non-Negotiable
Before every session: shoulder rolls, arm circles, wrist rotations, palm stretches. Five minutes.
After every session: chest stretch, wrist flexion stretch, shoulder cross-body stretch. Five minutes.
A resistance band is one of the best small investments you can make for shoulder health and mobility work. Use it before sessions. It accelerates progress noticeably.
Quick Note for Type 1 Beginners
If you started this guide already able to do ten to fifteen pushups — skip the wall pushup and knee pushup phases. Start from the incline pushup weight progression, work the proper pushup form checklist thoroughly, and use the variations list as your roadmap. Progressive overload is your focus now.
Conclusion
The gap between zero pushups and advanced pushup training is bridged entirely by preparation, patience, and consistency — not talent, not genetics, not any special equipment.
This system — two months of foundation work followed by progressive strength building — is exactly what I wish someone had shown me at the beginning.
Drop your questions in the comments below. I answer every one. And if you want to be taken from wherever you are right now all the way to your goal — stay consistent, do not skip sessions, and trust the process.
Next post: the 100 pushup challenge and 200 pushups a day — full breakdown of benefits, risks, and who should actually attempt them.
READ ALSO: Is Running Good For Weight Loss
Frequently Asked Questions
How long does it take to learn pushups?
Most beginners who follow a structured preparation routine — starting with shoulder mobility, wrist work, wall pushups, and incline pushups — can do their first clean full pushup within 6 to 8 weeks. Everyone’s body adapts at a different pace, so some may get there sooner and some may take a little longer. Consistency matters far more than speed.
Are wall pushups effective?
Yes, wall pushups are genuinely effective — especially for complete beginners. They teach your body the correct pushing movement pattern, begin activating your chest, shoulders, and triceps, and prepare your wrists for the load of a full pushup. Skipping wall pushups and jumping straight to harder variations is one of the most common beginner mistakes.
Should beginners do pushups every day?
In the early phases — shoulder mobility work, wrist prep, and wall pushups — daily practice is encouraged because the intensity is low and habit formation is the goal. Once you move to incline pushups and full pushups, 3 to 4 sessions per week with rest days in between allow your muscles to recover and grow properly. Training hard every single day without recovery often slows progress rather than speeding it up.
Why do pushups hurt my wrists?
Wrist pain during pushups is almost always caused by one of two things: unprepared wrists that have never been trained for weight-bearing, or incorrect hand placement. This is exactly why Week 3 and 4 of this guide focus entirely on wrist and palm preparation before any pushup variation begins. Daily palm rotations, wrist flexion stretches, and wrist circles significantly reduce or eliminate this pain for most beginners. If pain persists despite proper preparation, consult a professional.
Are knee pushups good for beginners?
Knee pushups are good — but they work best at a specific stage of training, not as the very first step. In this guide, knee pushups come after wall pushups and incline pushups because by that point your shoulders, wrists, and arms are already prepared. At that stage, knee pushups serve a specific purpose: building core strength as your body gets closer to the ground. Done in the right order, they are a genuinely useful progression tool.
RELATED GUIDES AND SOURCES
National Academy of Sports Medicine (NASM)
Cleveland Clinic Wrist Pain Guide
Blog History
This article is regularly reviewed and updated by our medical research team to ensure accuracy, relevance, and evidence-based insights.
Posted On:
Last Updated:

ISSA Certified Personal Trainer | Nutrition Specialist (Boston University)
Naithen Matthews is an ISSA-certified personal trainer and a nutrition graduate from Cornell University, with advanced graduate study (MS and PhD level work) in Nutrition & Metabolism focusing on nutrient metabolism, energy balance, chronic disease mechanisms, and obesity.
With over five years of experience in fitness coaching and more than two years of writing in the health and wellness space, Naithen specializes in metabolism, women’s health, weight management, and natural wellness. He is passionate about turning complex science into clear, practical guidance that anyone can understand.
Naithen’s work reflects strong E-E-A-T principles, combining real-world coaching experience with evidence-based nutrition knowledge to help readers make safe, informed, and confident health decisions.


Leave feedback about this